Delivery notes
General
Delivery notes can be created manually or transferred via an interface. Depending on the configuration, the delivery note is preceded by a purchase order; this document contains the advised delivery for a client that is to arrive in the warehouse at a later date (see Purchase orders).
As soon as the notified delivery has arrived, a goods receipt is generated on the basis of the delivery note. In principle, it is possible that the incoming delivery may differ from the notification in terms of the number of items and/or quantity. Over- and under-deliveries are therefore possible. Deviations from the payment advice note can be corrected by adding, deleting or editing the goods receipt items.
Process description
Delivery notes can be transferred to the goods receipt as follows:
Automatic receipt:
Coglas creates the storage units based on the master data stored for the item.
Manual collection:
Coglas proposes the storage unit constellation created below, which can, however, be customised.
Automatic collection (Pos):
Like Automatic collection, but only for the selected items.
Manual collection (Pos):
Like manual collection, but only on the selected items.
Create goods receipt note

The order items are displayed in the Items tab. The files stored for the delivery note are displayed under Attachments. All orders and goods receipts resulting from this delivery note are displayed under Linked lists:

The revision history shows all changes to this delivery note:

From version 2.137, item consolidation takes place during automatic and manual collection if all stock qualifications match. The quants are merged in the process. The consolidation can be seen in the goods receipt and the stock movements ("Compact storage unit"). Furthermore, consolidation only takes place if no loading unit type or storage unit barcode is specified in the delivery note item, but only if these also match exactly.
Functions
Button | Function |
|---|---|
Add delivery note | This function is used to manually create a delivery note. An input screen appears in which the fields delivery note number, lorry or container identifier, reference no., reference no.2 and the target strategy are entered. ’Add delivery note’ creates a new delivery note without any delivery items; these must be added manually. |
Add new position | Adds a new delivery note item, see also below. |
Automatic collection | The number of storage units to be created with the respective stock quantity is automatically calculated on the basis of the item details for the article, quantity, loading equipment and quantity per storage unit. If the required loading equipment is not specified, the ‘EURO’ type is automatically used. An SSCC/SSCC number is assigned automatically. |
Create goods in receipt | Based on the delivery note positions, the goods receipt note can be created piece by piece. This enables precise control and allocation of the items to the load carriers. |
Print overview | The delivery note including items is output in a printable report. |
Automatic collection (Pos) | As above under automatic collection, except that this ONLY takes place on the selected delivery note items. |
Manual collection (Pos) | As above under manual collection, except that this ONLY takes place on the selected delivery note positions. |
 | Checkbox for selecting/deselecting an order position. |
 | Calling up the delivery note item for editing, only works for items with a status not equal to Completed. |
Select all on current page Unselect all on current page | Selects or deselects all items on the current page. |
 | The delivery note position is deleted. |
Delete selected | All selected items are deleted. |
Edit / add new delivery note position
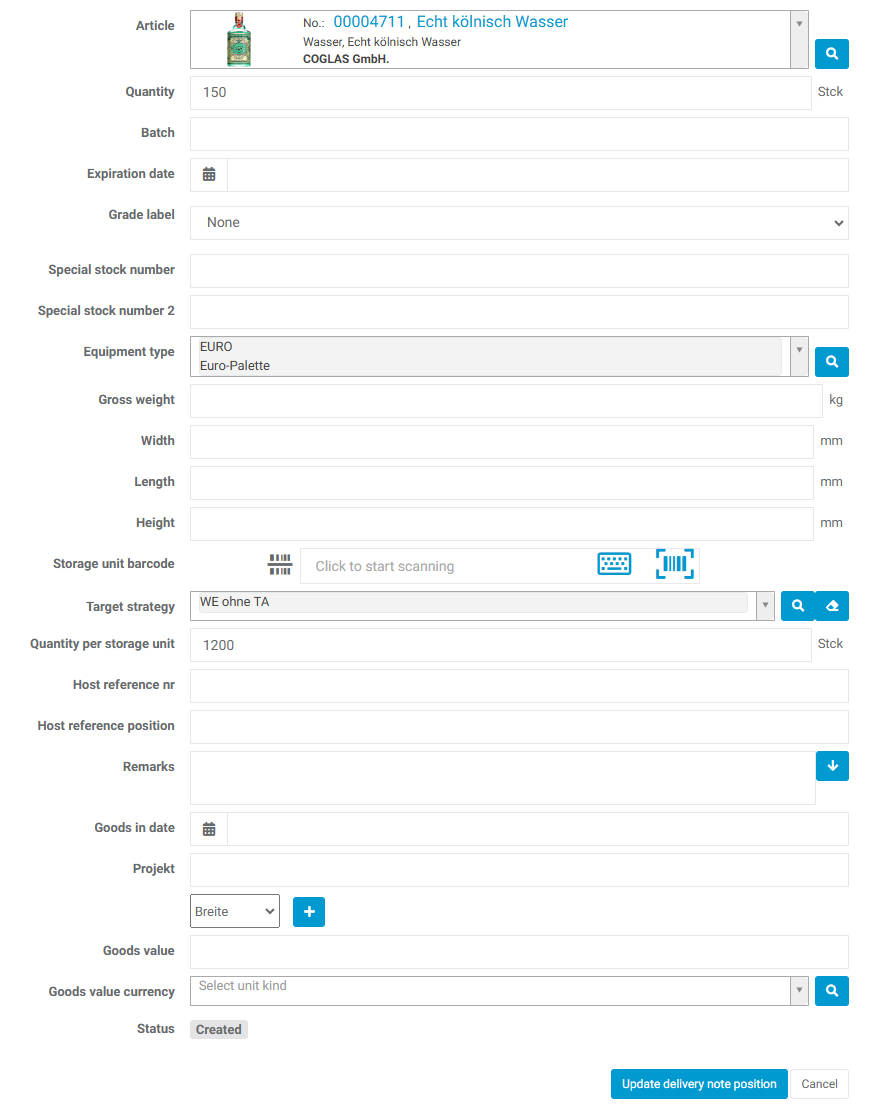
If a new delivery note position is added, at least the Article and Quantity fields must be filled in, as well as all other data fields. The loading equipment and the quantity per storage unit are used to create the load carrier units during automatic collection. A new position is added to the delivery note with ‘Add delivery note position’. If the respective item is edited, the changed data field is updated via ‘Update position’.
Warnings
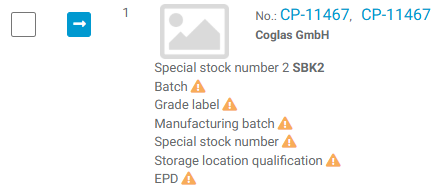
If mandatory fields are specified for an article in the master data, missing data is displayed at the position with a warning message.
The goods receipt can only be completed once all the required data has been entered.
Manual collection
Once this functionality has been selected, you can allocate the quantities to the individual articles yourself. In accordance with the specifications for automatic collection, the articles are already separated according to the stored storage units, but you have the option of customising these individually.

The following functions are offered for this purpose:
Button | Description |
|---|---|
 | In order to add any required stock qualifications to the items, you can select which ones are to be included in the manual collection for each item. Collection. The additional entries for Special stock number, best before date, production date can be selected via the dropdown menu and activated via the ‘+’. |
 | Here you can either enter the quantity to be recorded directly or use the +/- buttons to increase/decrease the quantities in the respective unit by +1 or -1. |
 | The split symbol allows you to split an item into another load unit. A new load unit created in this way can be deleted again via the ‘recycle bin’. |
 | The loading unit and the loading equipment must be selected for each manual collection. The loading equipment is selected via a selection box (if it was not already set in the master data of the article). The value of the loading unit is set as loading unit A for the first pallet, then as B, C etc. for each subsequent pallet. Items can thus be assigned to already linked loading units (which then become mixed pallets for different items) or to a new loading unit. |
 | Each loading unit can be assigned a unique SSCC number (own SSCCs, SSCCs from the roll) if automatic assignment by COGLAS is not desired. After activating the barcode button, the barcode can be scanned or entered manually using the keyboard symbol. |
 | If ‘Process’ is selected, the load units are created according to the distribution and stored with any additional stock qualifications that have been entered. |
Once the delivery note has been created, you can start the manual collection.

The pallets are stored in the article master in the collection process based on the packaging units. It is now possible to create individual specifications:
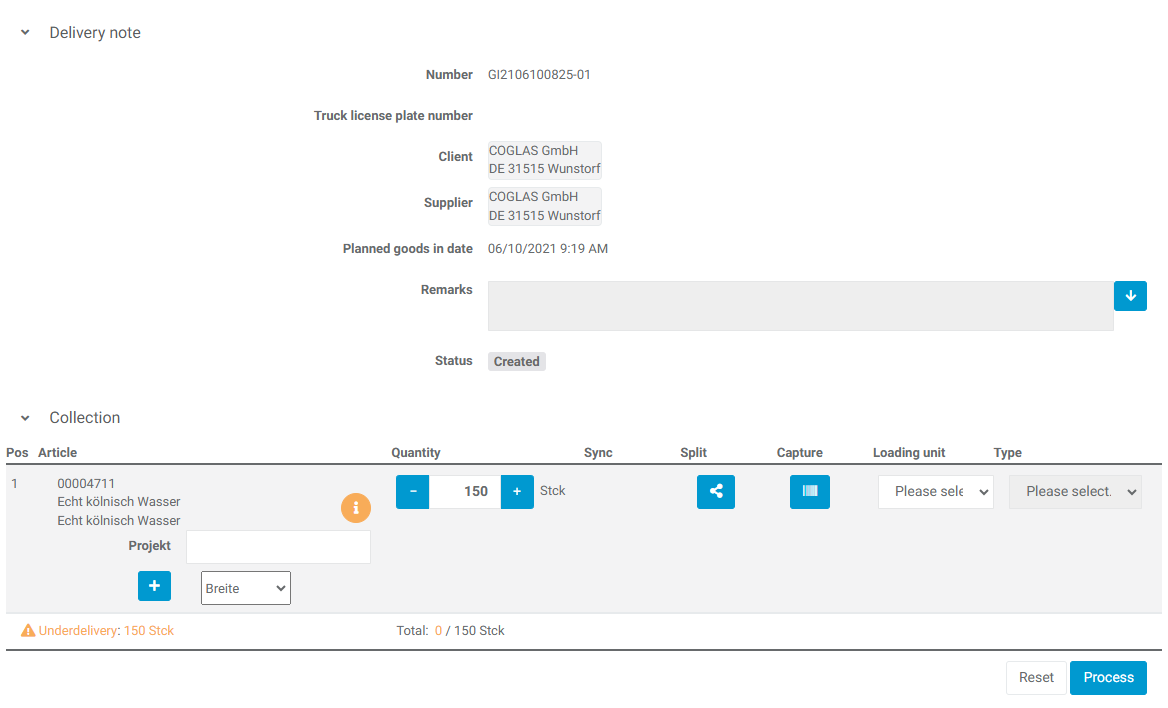
The goods can be split up. Photos of the load unit can be stored. In addition, existing SSCCs can be scanned and used for further processing. Several loading units can be created and different types of loading equipment can be stored.
Manual collection
The goods receipt slip is generated in the delivery note by automatic or manual receipt. It is now possible to create a blank goods receipt note in which the individual items can be inserted one after the other. This makes the user more flexible and allows them to create their own customised goods receipt note, which they can process item by item.
Functionality
Button | Explanation |
|---|---|
Create goods receipt note | Once the delivery note has been created, you can use this button to create a goods receipt note. |
Add new position | Once the blank goods receipt has been created, the individual items can now be added to the delivery note. Note: Only the items in the delivery note are displayed here. |
Select | A specific position can be edited with the selection. |
Add position | To be able to add a goods receipt item, the mandatory fields Loading equipment, Barcode, Quantity must be filled in. |
Note - Underdelivery | If a specific quantity has already been allocated, the corresponding data is updated:
|
Add article | If an additional item is added, another item can be added to the loading equipment. In this way, mixed pallets can be created. |
Register goods in | Once all items have been added to the goods receipt note, the goods receipt can be posted. |
Target strategy | Depending on the target strategy, the status in the items is updated:
|
Setup
The blank goods receipt slip can be created in the delivery note. To do this, we can click on ‘Create goods in receipt’.

The blank delivery note is then created and the individual items can be added to the delivery note. The individual items can be edited by selecting them. You then have the option of specifying the storage unit and entering further information such as batch, special stock number, quantity, etc.
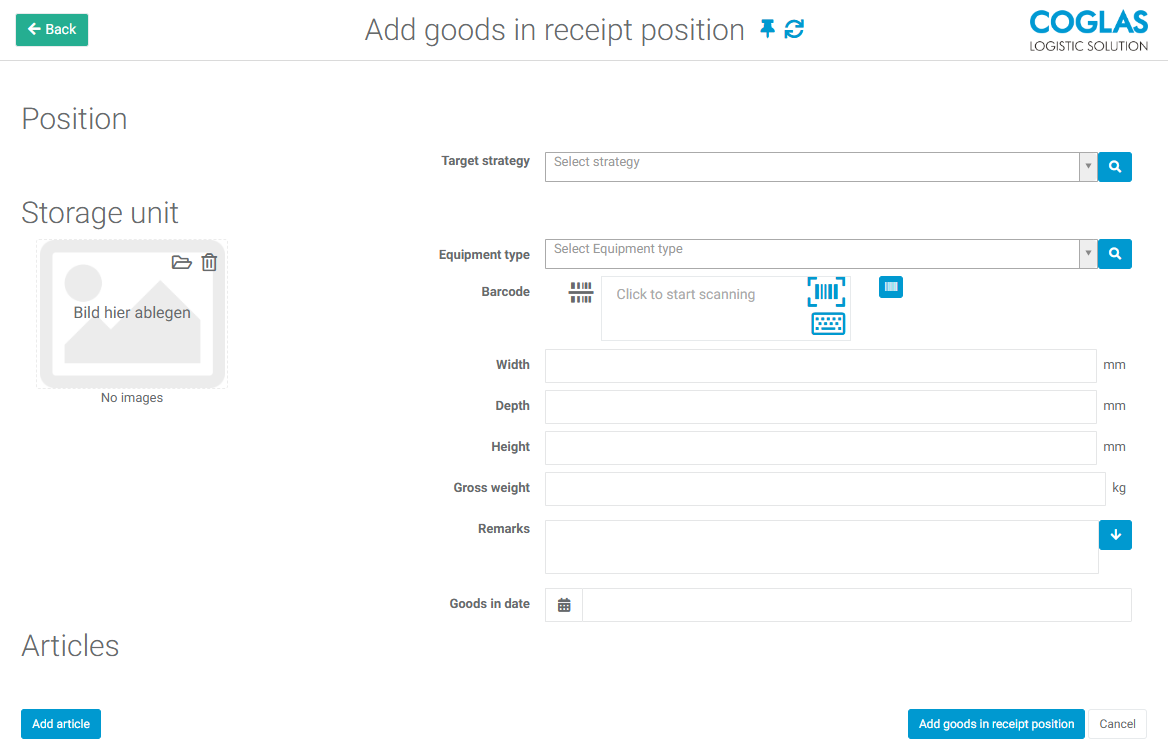
If the items are completely transferred to the goods receipt note, the goods receipt can be posted.
Create goods receipt note
If this function is selected, you have the option of combining items from the delivery note into loading units, completely independently of specifications.
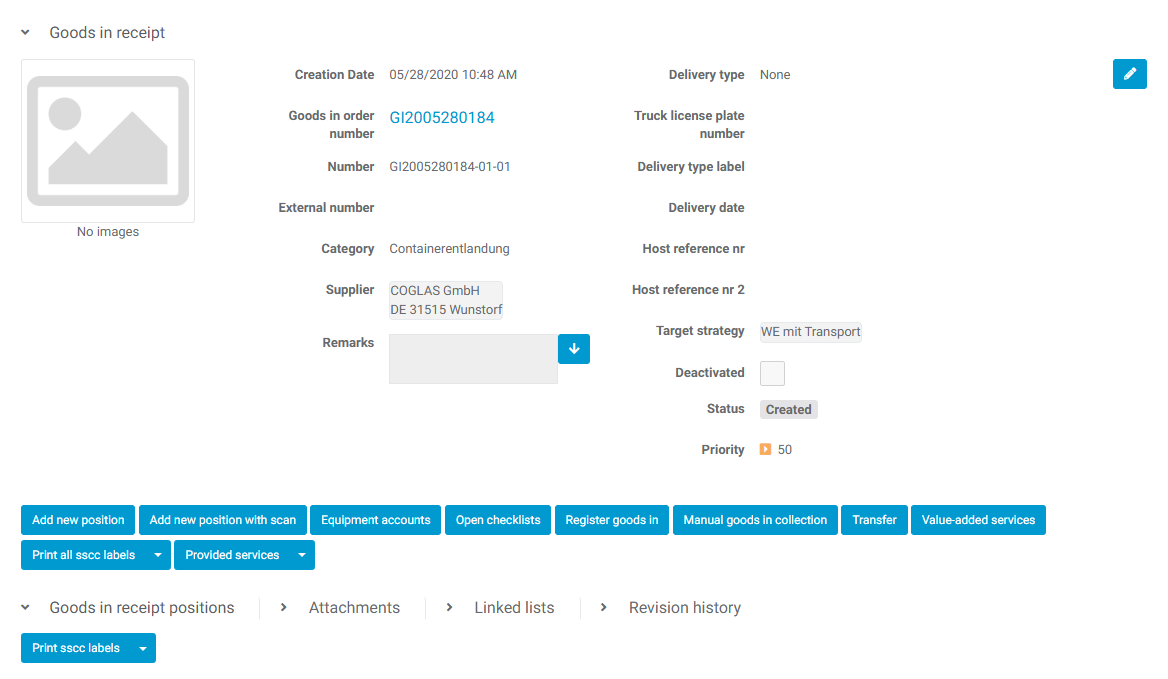
Button | Explanation |
|---|---|
Add new position | You receive an overview of the items stored on the delivery note and select an item. You can then enter the data for the strategy, loading equipment, barcode, item stock qualifications and quantity. The barcode is mandatory and must either be created If mixed pallets are created in this step, additional items can be added to the loading unit via ‘Add item’. Items that are no longer required are removed from the load unit via ‘Remove item’. This item is accepted with ‘Add goods in receipt position’. |
Loading equipment accounts | If loading equipment accounts are managed for suppliers/clients, you can manage the pallet exchange or similar for the goods receipt here, see also Loading equipment accounts. |
Manual collection | The article items stored in the delivery note can also be collected manually here. |
Register goods in | The load units are booked according to the stored strategies and transport orders are generated. See also Strategies. |
Print all sscc labels | - |
Value added services | The services stored under Value added services - Value added services are displayed here and can be assigned to the delivery note. |
Setup
SSCC number can be defined per client, see System - Business partners - Client. Packaging units and quantity for the article can be stored under System - Articles - Packaging units. Delivery notes can also be imported via the import interface as an Excel list or JSON file, but can also be set directly via the WepAPI.
Warning notes
The following warnings may occur within the processes:
Hinweise | Explanation |
|---|---|
Validation has failed. Please check the entries | Not all mandatory fields have been entered, see also fields marked in red. |
Delivery note item is already being processed | It is not possible to delete a delivery note item that is already being processed. |
Goods have the wrong status | Only order items with the status Created can be duplicated. |
Goods receipt item has already been completed | An order item cannot be deleted in the ‘Completed’ or ‘Transferred to ERP’ status. |
Goods receipt item is already being processed | An order item cannot be deleted in the In process status. |
No loading unit assigned | At least one loading unit was not selected during manual collection. |
Quantity is required. | The Quantity field in the open mask is not filled. |
Missing authorisations | Authorisation is missing for the functionality that should be executed. Please contact the key user. |
→ back to COGLAS processes
→ back to COGLAS menu
